Types Of Garden Stones: Choosing The Perfect Aggregate
Explore the world of landscaping and discover the myriad ‘Types of Garden Stones’ that can breathe life and character into your outdoor haven.
In this insightful guide, we’ll take you on a journey through the enchanting realm of garden stones, unveiling their diverse forms, unique features, and how to harness their beauty to transform your garden into a captivating oasis.
From classic choices like gravel and chippings to the grandeur of large garden stones, you’ll uncover the secrets of selecting the perfect stones to suit your style and elevate your landscaping game.
Join us as we delve into the art of garden stone selection, learning about their individual strengths, applications, and the magic they bring to your green sanctuary.
Types Of Garden Stones
Gravel

Gravel, a beloved favourite, offers a vast palette of colours, sizes, and textures that can cater to the most diverse landscape designs.
From the sleek and modern Polar White to the inviting warmth of Golden Gravel, and even the earthy charm of chestnut Pea or the sophistication of Flamengo, gravel has a spectrum that suits any garden vision.
In the world of natural materials, gravel brings its unique character, varying notably in size. For expansive landscaping or driveways, the chunkier 14-20mm gravel reigns supreme, offering a robust foundation.
On the flip side, for pathways where comfort underfoot matters, the smaller and rounded Gravel 10mm is the ideal choice.
When it comes to driveways, 20mm Gravel takes the lead, thanks to its angular shape that naturally interlocks, making it not only beautiful but also practical for driving.
Now, let’s delve into the delightful advantages of gravel. Its versatility knows no bounds, fitting seamlessly into a wide array of landscaping projects. Lay it with minimal preparation, and you’ll revel in its easy maintenance. The natural knack of gravel for weed suppression is a boon for any gardener, freeing you from the relentless battle against unwanted green invaders.
But the beauty of gravel doesn’t stop there. It adds a captivating final touch to water features and wildlife ponds. Picture this: mixing and matching various gravel colours and shades to create a chic, pond-edge masterpiece. It’s all about elevating your garden aesthetic effortlessly.
So, whether you’re crafting a serene sanctuary or a vibrant outdoor haven, gravel is your trusted companion, offering not just functionality but also a touch of elegance to your landscape canvas.
Pros:
- Versatile: Gravel is incredibly versatile and can be used for pathways, driveways, or as a ground cover around plants.
- Excellent Drainage: Its permeable nature allows rainwater to seep through, reducing runoff and preventing puddles.
- Low Maintenance: Gravel is easy to maintain, requiring periodic raking and replenishment to keep it looking fresh.
- Cost-Effective: It’s often an affordable choice compared to other garden stones.
Cons:
- Movement: Gravel can shift and migrate over time, requiring occasional levelling.
- Weed Growth: Weeds may sprout through the gravel, necessitating weed control measures.
- Difficulty for Mobility Aids: It’s not the best choice for paths where wheelchairs or strollers need easy access.
Slate Chippings
Slate chippings emerge as the versatile, eco-friendly solution to elevate your garden’s aesthetics. They’re the go-to choice for enhancing various garden areas, from rockeries to ponds, borders to driveways.
What’s remarkable about 20mm Slate Chippings is their flatness, providing a comfortable and attractive surface for pathways that invite leisurely strolls.
When you opt for slate chippings, you’re not just adding beauty to your garden but also making an eco-conscious choice. These chippings are classified as recycled material, originating as by-products of roofing slate manufacturing.
This means you’re contributing to a more environmentally friendly garden space compared to using other garden stones.
Slate comes in an enticing range of natural colours, including the rich hues of plum, calming greens, deep blues, and the elegant graphite grey. The versatility of slate extends to its sizing options, offering you flexibility in design.
One of the standout advantages of incorporating slate chippings into your garden is their exceptional weed control capabilities.
By choosing slate, you’re not just creating a beautiful garden; you’re also ensuring that unwanted weeds stay at bay, giving your garden a neat and tidy appearance all year round.
Pros:
- Decorative: Chippings come in various colours and sizes, making them a decorative choice for garden borders and pathways.
- Low Maintenance: Similar to gravel, chippings are relatively low-maintenance and require periodic raking.
- Natural Appearance: They can give your garden a natural, rustic appearance.
- Weed Control: When properly installed, chippings can help suppress weed growth.
Cons:
- Sharp Edges: Some chippings can have sharp edges, which may not be suitable for play areas or high-traffic zones.
- Occasional Replacement: Over time, chippings may break down and require replenishing to maintain their appearance.
- Limited Load-Bearing Capacity: Chippings are not ideal for heavy-duty applications like driveways.
Check out our range of decorative aggregates, including slate chippings here.
Cobbles & Pebbles
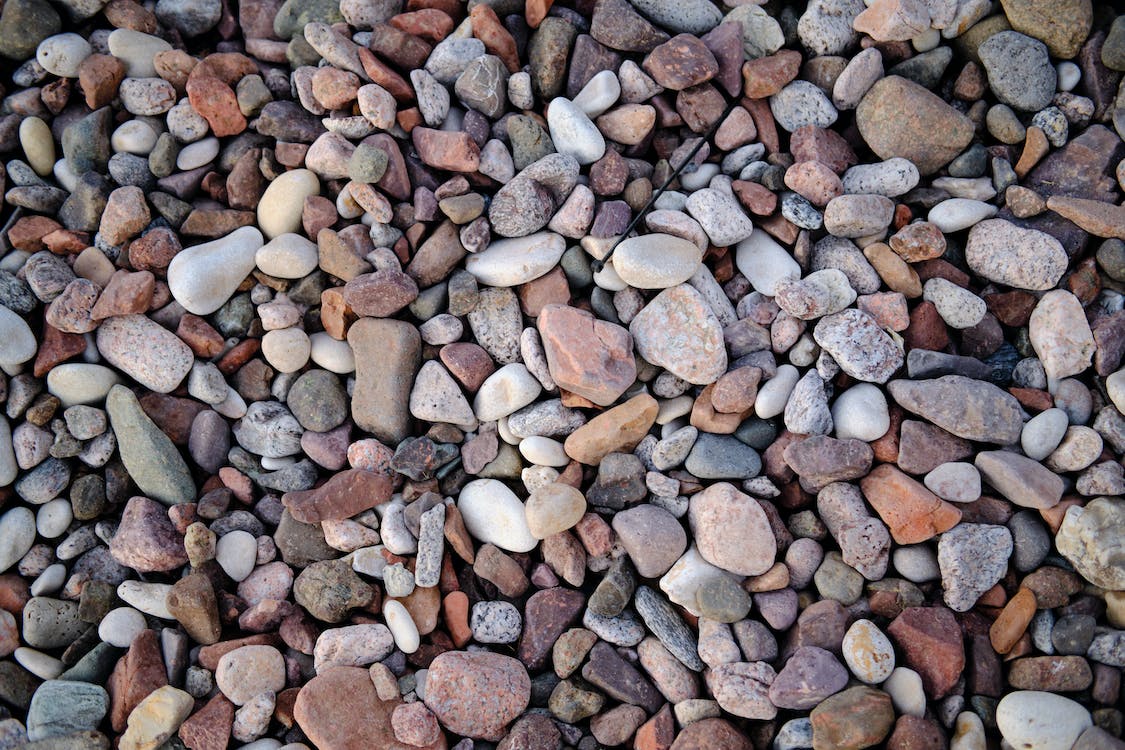
Cobbles and pebbles, these larger stones, distinguish themselves with a smooth, rounded finish, adding an element of elegance to any garden.
Picture them as the stylish, eye-catching additions that transform your outdoor space into a visual delight.
Their versatility knows no bounds, whether you’re creating a captivating rockery formation, infusing designer aesthetics into borders, accentuating the charm of ponds, aquatics, or elevating the allure of planting beds.
But where cobbles and pebbles truly shine is in stone garden water features. Their smooth texture, akin to polished gems, sparkles and glistens magnificently when kissed by water.
When it comes to sizing, pebbles typically range from 20-60mm, while cobbles step up the game with sizes ranging from 40-100mm.
The allure of these stones lies in their natural shapes, forged by the ceaseless caress of flowing water, resulting in their distinctive rounded forms.
If your garden dreams involve ornate decorative borders or the soothing presence of an attractive water feature or pond, look no further.
Cobbles and pebbles are the perfect ingredients to bring your vision to life, infusing elegance and a touch of nature into every corner of your outdoor haven.
Pros:
- Aesthetic Appeal: Cobbles and pebbles offer a visually appealing addition to your garden. Their smooth, rounded finish lends a touch of elegance and natural beauty to your outdoor space.
- Versatility: These stones are incredibly versatile. They can be used to create captivating rockeries, define borders, enhance the aesthetics of ponds and water features, or add texture to planting beds.
- Glistening Water Features: Cobbles and pebbles are particularly popular for water features due to their smooth texture. When wet, they glisten beautifully, creating an enchanting and soothing effect.
- Natural Colour Tones: Certain types, like Scottish Cobbles and Pebbles, reveal their natural colour tones when in contact with water, enhancing their beauty and appeal.
- Diverse Sizing: Pebbles typically range from 20-60mm, while cobbles come in larger sizes, ranging from 40-100mm. This diversity in sizing allows for various design possibilities.
- Natural Origins: The rounded shapes of cobbles and pebbles are a result of natural processes, where they’ve been smoothed by flowing water, adding an authentic touch to your garden.
Cons:
- Heavyweight: Cobbles and pebbles can be quite heavy, which may require additional effort during installation and make them less suitable for certain applications.
- Cost: Depending on the type and quantity, these stones can be relatively expensive compared to other landscaping materials, which might impact your landscaping budget.
- Limited Load-Bearing Capacity: While they’re excellent for decorative purposes, cobbles and pebbles are not ideal for high-traffic areas or as a foundation for heavy structures like driveways.
- Maintenance: Over time, they may shift or require levelling, especially in areas with heavy rain or foot traffic, necessitating periodic maintenance.
- Weed Growth: The gaps between cobbles and pebbles can sometimes allow weed growth, which might require weed control measures to maintain a tidy appearance.
Large Garden Stones & Feature Stones
Embrace the grandeur of your garden! A truly stunning garden is incomplete without a captivating focal point, and large garden stones are your key to achieving this splendid effect.
When we say large garden stones, we’re talking about a diverse range, from majestic boulders that command attention to artfully shaped rockery stones, mesmerizing feature stones, and even chic slate planters.
Imagine this: Your garden boasts shaded areas where the struggle to grow plants is real. Here’s where a rockery or a statement stone feature swoops in to transform that empty canvas into a masterpiece.
Boulders and rockery stones, available in an array of shapes and sizes, from jagged and angular to softly rounded, offer endless possibilities for adding character to your garden.
Part of the delightful journey of designing with large stones is the art of placement. You can opt for a single grand specimen stone that stands as a majestic soloist, drawing all eyes to its beauty.
Alternatively, you can gather a cluster of feature stones, crafting an ensemble that tells a story of texture and charm.
For an extra splash of vibrancy and texture, consider spreading decorative gravel or infusing vibrant plantings between these stately stones.
It’s all about infusing life, colour, and intrigue into your garden’s landscape.
Pros:
- Striking Focal Points: Large garden stones and feature stones can serve as stunning focal points in your garden, adding visual interest and depth.
- Customization: They allow for creative and customized landscaping designs.
- Durability: Properly placed large stones can last for generations, requiring minimal maintenance.
Cons:
- Heavy Installation: The placement of large stones typically requires heavy machinery and professional installation.
- Cost: Acquiring and installing large stones can be costly, especially for unique or rare specimens.
- Limited Usability: Large stones are best used for specific aesthetic or structural purposes rather than widespread coverage.
Choosing the Right Garden Stones
Selecting the perfect garden stones for your landscaping project requires thoughtful consideration.
The choice of stones should align with your overall design, budget, and long-term maintenance preferences.
Considerations for Selecting the Perfect Stones
Before you dive into choosing garden stones, it’s essential to evaluate your specific needs and preferences. Consider the following factors:
- Intended Use: Determine the primary purpose of the stones – for walkways, patios, borders, or decorative accents.
- Climate: Think about your local climate conditions, as some stones may be more suitable for certain environments.
- Budget: Establish a budget for your landscaping project, and explore stone options that fit within your financial constraints.
- Aesthetic Appeal: Consider the look and feel you want to achieve in your garden, whether it’s rustic, modern, or something in between.
- Maintenance: Assess how much time and effort you’re willing to invest in stone maintenance, as some materials require more care than others.
- Sustainability: If environmental considerations are a priority, research eco-friendly stone options that minimize your ecological footprint.
By carefully weighing these factors, you can narrow down your choices and make an informed decision regarding the selection of garden stones that best suit your needs and preferences.
Installation and Maintenance
Proper installation and maintenance are crucial to ensure the longevity and beauty of your garden stones. In this section, we’ll explore essential guidelines for both aspects of stone care.
Proper Installation Techniques
Installing garden stones correctly is vital to their performance and durability. Here are some key steps to consider:
- Foundation Preparation: Ensure that the base beneath the stones is well-compacted and properly graded to prevent settling and uneven surfaces.
- Edge Restraints: Use edge restraints, such as metal or plastic borders, to keep the stones in place and prevent shifting over time.
- Spacing and Alignment: Pay attention to spacing and alignment to create visually pleasing patterns and allow for proper drainage.
- Proper Bedding Material: Choose the appropriate bedding material, such as sand or gravel, to provide stability and support for the stones.
Maintaining the Beauty of Garden Stones
Maintaining the appearance of your garden stones is relatively straightforward with regular care and attention. Here are some tips for keeping them in top condition:
- Regular Cleaning: Sweep or hose down the stones regularly to remove dirt, debris, and organic matter. For stubborn stains, use a mild detergent or stone-specific cleaner.
- Weed Control: To prevent weeds from growing between the stones, consider using landscape fabric or applying an appropriate weed inhibitor.
- Sealing: Some stone types benefit from sealing to protect against staining and moisture penetration. Consult with a professional to determine if sealing is necessary for your specific stones.
- Repairing Damages: Address any cracked or damaged stones promptly to prevent further deterioration. Replacing a damaged stone can help maintain the integrity of your landscape.
Taking the time to install garden stones correctly and providing routine maintenance ensures that your outdoor space remains beautiful and functional for years to come.
Functional Uses of Garden Stones
Garden stones serve various functional purposes in landscaping, enhancing both the practicality and aesthetics of your outdoor space. In this section, we’ll explore some common uses of garden stones.
Creating Walkways and Pathways
Garden stones are often used to create charming walkways and pathways throughout your landscape.
Whether you prefer a formal brick pathway or a more natural stone-stepping path, these features add structure and guide visitors through your garden.
Pathways can be designed to highlight specific garden areas, lead to focal points, or simply provide a pleasant journey through your green oasis.
Garden stones are available in various sizes and shapes, allowing you to create patterns and designs that match your garden’s style.
Stunning Garden Borders and Edging
Garden borders and edging play a crucial role in defining different garden areas, keeping plants in check, and preventing soil erosion.
Garden stones are an excellent choice for creating borders and edging due to their durability and aesthetic appeal.
You can use larger stones to create raised flower beds or retaining walls, while smaller stones or pebbles can define the edges of your garden beds.
These borders not only add structure but also serve as a visual transition between different garden elements, enhancing the overall aesthetics of your landscape.
Stone Accents in Water Features
Water features such as fountains, ponds, and waterfalls are brought to life with the addition of garden stones. These stones create a natural look and help integrate the water feature seamlessly into your garden design.
By strategically placing garden stones in and around your water feature, you can mimic the appearance of a natural streambed or riverbank.
This not only enhances the visual appeal but also provides a habitat for beneficial aquatic plants and wildlife.
Incorporating garden stones into your landscape design not only adds functionality but also contributes to the overall beauty and ambiance of your outdoor space. Next, we’ll explore how decorative stones can infuse personality into your garden.
Adding Personality with Decorative Stones
Decorative stones are a versatile and creative way to personalize your garden and make it uniquely yours.
In this section, we’ll delve into the various ways you can use decorative stones to add character and charm to your outdoor space.
Using Pebbles and River Rocks
Pebbles and river rocks are small, smooth stones that come in a range of colours and sizes. They can be used in various creative ways, such as:
- Mulch Alternative: Replace traditional mulch with river rocks or pebbles to create a low-maintenance and visually appealing ground cover.
- Zen Garden Accents: Arrange pebbles in intricate patterns or use them to create a calming Zen garden.
- Water Feature Enhancements: Place river rocks around the base of fountains or in the bed of a pond to enhance the natural appearance of water features.
- Accentuating Planters: Use pebbles and river rocks to fill the space around potted plants or succulents, adding a polished look to your garden.
- Stepping Stones: Create whimsical pathways or stepping stone arrangements using flat river rocks that invite exploration in your garden.
The versatility of pebbles and river rocks allows you to experiment with different designs and styles, making your garden truly unique.
Decorative Stone Arrangements
Decorative stones can be artistically arranged to create eye-catching focal points or intriguing designs within your garden. Consider these creative ideas:
- Rock Gardens: Craft a captivating rock garden with a variety of stones, showcasing different shapes, sizes, and textures. Combine them with drought-tolerant plants for a low-maintenance and visually striking garden.
- Mosaic Art: Break larger stones into smaller pieces and use them to create intricate mosaic designs on garden walls, planters, or garden furniture.
- Stone Sculptures: Commission or create your own stone sculptures to serve as captivating focal points within your garden. These can range from abstract sculptures to animal figures, adding personality to your outdoor space.
Decorative stone arrangements allow you to express your creativity and infuse your garden with a sense of artistry and wonder.
Incorporating Sculptures and Focal Points
Garden stones can complement other artistic elements, such as sculptures and garden ornaments.
When strategically placed, stones can draw attention to these focal points and enhance their visual impact.
Consider placing stones around a sculpture’s base or creating a stone pedestal to elevate the artwork. This not only highlights the sculpture but also grounds it within the natural landscape.
Garden stones can also be used to frame and accentuate other ornamental elements, such as birdbaths, trellises, or outdoor seating areas.
By incorporating decorative stones and artful arrangements, you can infuse personality and charm into your garden, making it a reflection of your unique style and preferences.
Environmental Considerations
As stewards of the environment, it’s essential to consider the ecological impact of your landscaping choices. In this section, we’ll explore environmentally friendly options when it comes to garden stones.
Eco-Friendly Stone Choices
If you’re passionate about sustainability, there are eco-friendly stone choices that align with your values. These options include:
- Reclaimed Stones: Opt for reclaimed or salvaged stones from demolition sites or historical buildings. Repurposing these stones not only reduces waste but also adds character and history to your garden.
- Local Stone Sourcing: Choose stones that are sourced locally to reduce the environmental footprint associated with long-distance transportation. Local stones are often readily available and can support regional economies.
- Recycled Materials: Consider using recycled stone products, such as crushed concrete or recycled glass aggregate, as sustainable alternatives for pathways and landscaping features.
By selecting eco-friendly stone options, you can minimize the environmental impact of your landscaping project while still enjoying the beauty and functionality of garden stones.
Permeable Pavers for Sustainable Landscaping
Permeable pavers are an environmentally responsible choice for hardscaping elements like driveways and patios.
These pavers allow rainwater to seep through the gaps between stones, reducing runoff and helping recharge groundwater.
The environmental benefits of permeable pavers include:
- Storm water Management: Permeable pavers help mitigate flooding and erosion by allowing rainwater to infiltrate the ground slowly.
- Water Quality Improvement: They filter out pollutants from rainwater, enhancing water quality as it returns to the soil.
- Sustainable Landscaping: Permeable pavers promote sustainable landscaping practices by supporting healthy soil and vegetation.
Incorporating permeable pavers into your garden design is a proactive step towards sustainable and environmentally conscious landscaping.
Garden Stone Safety
Safety should be a top priority when using garden stones in your outdoor space, especially if your garden is frequented by children and pets.
In this section, we’ll explore safety measures to consider.
Non-Slip Solutions for Pathways
Slippery pathways can pose a safety hazard, particularly during wet or icy conditions. To prevent slips and falls, consider the following non-slip solutions:
- Textured Surfaces: Choose garden stones with textured surfaces or those specifically designed for slip resistance. These stones provide better traction underfoot.
- Anti-Slip Coatings: Apply anti-slip coatings or treatments to existing stone surfaces to enhance their grip.
Prioritizing non-slip solutions ensures that your garden remains safe for everyone, even in adverse weather conditions.
Child and Pet-Friendly Stone Options
When designing your garden, it’s crucial to select stones that are safe for children and pets. Some considerations include:
- Smooth Edges: Opt for garden stones with smooth edges to prevent injuries from sharp corners or edges.
- Non-Toxic Materials: Ensure that the stones you choose are non-toxic and safe for accidental contact or ingestion by children and pets.
- Securely Installed Stones: Properly install garden stones to prevent tripping hazards or loose stones that could pose a risk.
Creating a safe environment within your garden allows everyone, including children and pets, to enjoy the outdoor space without worry.
Fire-Safe Stones for Outdoor Cooking Areas
If your garden includes an outdoor kitchen or cooking area, it’s essential to select fire-safe stones.
These stones can withstand high temperatures without cracking or deteriorating, ensuring your outdoor cooking experience remains safe and enjoyable.
Popular fire-safe stone options include natural stones like granite and certain types of concrete pavers designed for use in outdoor kitchens.
Be sure to consult with a professional when designing outdoor cooking areas to ensure compliance with safety standards.
Prioritizing safety in your garden design ensures that your outdoor space remains a haven of enjoyment for everyone, free from potential hazards.
The Psychology of Garden Stones
The choice of garden stones goes beyond aesthetics; it can also impact the emotional atmosphere of your outdoor space.
In this section, we’ll delve into the psychology of garden stones and how they can influence the mood and ambiance of your garden.
Emotional Impact of Stone Selection
The type, colour, and arrangement of garden stones can evoke specific emotions and feelings within your garden. For example:
- Tranquillity: Soft, muted colours and gentle curves in stone pathways can create a sense of calm and relaxation.
- Elegance: Rich, dark stones and symmetrical patterns can evoke a feeling of sophistication and luxury.
- Playfulness: Brightly coloured pebbles and irregular arrangements can add a playful and whimsical touch to your garden.
By understanding the emotional impact of stone selection, you can intentionally design your garden to elicit the desired feelings and moods, enhancing your overall outdoor experience.
Creating a Tranquil Oasis with Stones
For many, a garden serves as a sanctuary, a place to escape the stresses of daily life. Garden stones play a pivotal role in creating a tranquil oasis within your outdoor space. Consider the following design elements:
- Water and Stones: The combination of water features, such as ponds or fountains, with carefully placed stones can create a soothing and serene atmosphere.
- Zen Gardens: Embrace the principles of Zen gardening by using simple arrangements of stones, gravel, and minimalistic plantings to cultivate a sense of inner peace.
- Seating Areas: Design cosy seating areas amidst your garden, using stone benches or natural stone as seating. This invites contemplation and relaxation.
The harmonious integration of garden stones into your landscape design can provide a haven of tranquillity, allowing you to escape the hustle and bustle of everyday life and find solace in your garden.
Stones as a Reflection of Your Personality
Your choice of garden stones can be a reflection of your personality and style.
Just as art and décor in your home reveal your tastes, the stones in your garden can convey your unique identity.
For instance:
- Bold and Creative: If you’re adventurous and creative, consider incorporating unusual stone shapes and colors into your garden design, making it a bold expression of your personality.
- Classic and Timeless: If you prefer timeless elegance, opt for traditional stone choices like granite or brick pavers, creating a garden that exudes classic charm.
- Minimalistic and Zen: A penchant for simplicity and inner calm might lead you to create a Zen-inspired garden with carefully selected stones and minimalistic elements.
Expressing your personality through your garden allows you to connect with your outdoor space on a deeper level, making it a place of personal significance and comfort.
Inspiring Garden Stone Ideas
To spark your creativity and inspire your garden stone projects, let’s explore a few enchanting garden design ideas that incorporate various types of stones.
Japanese Zen Gardens with Stone Features
Create a serene and meditative retreat with a Japanese Zen garden. Use smooth river rocks, carefully raked gravel, and strategically placed stones to symbolize elements like islands and mountains.
Add a central stone lantern or a bamboo water feature to complete the Zen ambiance.
A Japanese Zen garden is a perfect sanctuary for mindfulness and contemplation, offering a space for inner peace and tranquillity.
Mediterranean-Inspired Stone Courtyards
Embrace the allure of the Mediterranean by designing a stone courtyard reminiscent of Southern Europe.
Use rustic limestone or tumbled travertine to create an old-world charm. Plant aromatic herbs like lavender and rosemary in between the stones, infusing the air with delightful scents.
A Mediterranean-inspired stone courtyard provides a cosy and inviting space for al fresco dining and leisurely gatherings.
English Cottage Gardens with Cobblestone Paths
Capture the romantic essence of an English cottage garden with cobblestone pathways and borders. Cobblestones, with their irregular shapes and aged appearance, lend a timeless and charming character to your garden.
Plant a profusion of colourful flowers to complement the rustic stone surfaces.
An English cottage garden exudes warmth and nostalgia, offering a welcoming retreat filled with the beauty of nature.
Budget-Friendly Garden Stone Projects
Landscaping on a budget doesn’t mean compromising on style and quality. In this section, we’ll explore budget-friendly garden stone projects that allow you to transform your outdoor space without breaking the bank.
DIY Stone Projects for Small Budgets
If you have a limited budget, consider these do-it-yourself (DIY) stone projects:
- DIY Stone Pathways: Create charming garden pathways by collecting free or low-cost stones from local sources, such as construction sites or friends’ yards. Arrange them in an appealing pattern to guide visitors through your garden.
- Stone Mulch: Replace traditional mulch with small, local stones or pebbles. Not only is this cost-effective, but it also reduces the need for frequent mulch replacement.
- Stone Borders: Use rocks or stones found in your area to create natural garden borders. These can define garden beds and enhance your landscape without the expense of purchased materials.
These DIY projects are not only budget-friendly but also allow you to infuse your garden with a personalized touch.
Repurposing Old Stones for New Beauty
Repurposing old or salvaged stones is an eco-friendly and budget-conscious way to enhance your garden:
- Reclaimed Stones: Scout for reclaimed stones from demolition sites or local salvage yards. These stones often come at a fraction of the cost of new ones and add character to your garden.
- Reused Pavers: If you have old pavers or bricks lying around, consider repurposing them for a new project. Cleaning and arranging them creatively can breathe new life into your garden.
Repurposing old stones not only saves you money but also contributes to sustainable landscaping practices.
Saving Money Without Compromising Quality
To save money without sacrificing quality, consider the following tips:
- Comparison Shopping: Compare prices from different suppliers to find the best deals on garden stones.
- Buy in Bulk: Purchasing stones in bulk can often lead to cost savings. Consider teaming up with neighbors or friends for bulk purchases.
- Mix and Match: You can achieve a unique and budget-friendly look by combining different types of stones creatively. Mix natural stones with man-made pavers to create visually appealing contrasts.
With a little creativity and strategic planning, you can create a beautiful garden that suits your budget and reflects your style.
Working with a Professional
While DIY projects are satisfying, some garden designs may require the expertise of a professional landscaper or stone mason.
In this section, we’ll explore when to consult an expert and how they can help turn your vision into reality.
When to Consult a Landscaping Expert
Consider consulting a landscaping expert when:
- Your Project Is Complex: If your garden design involves intricate stonework, multi-level terraces, or extensive hardscaping, a professional can ensure structural integrity and aesthetic appeal.
- You Need Permits: Some landscaping projects require permits or compliance with local building codes. A professional can guide you through the permitting process.
- Large-Scale Projects: For substantial projects that involve heavy machinery, extensive excavation, or drainage solutions, a professional ensures safety and efficiency.
- Time Constraints: If you have limited time for your landscaping project, hiring professionals can expedite the process and deliver faster results.
Collaborating with Stone Masons and Designers
Stone masons and landscape designers are valuable partners in creating a stunning garden. Here’s how they can assist you:
- Expertise: Stone masons are skilled in working with stone materials, ensuring precise installation and a polished finish.
- Design Vision: Landscape designers can translate your ideas into a cohesive and aesthetically pleasing garden plan.
- Project Management: Professionals can manage the logistics of your project, including sourcing materials, coordinating labor, and adhering to timelines.
Collaborating with experts can streamline the landscaping process and guarantee a successful outcome that aligns with your vision.
Frequently Asked Questions (FAQs)
FAQ 1: Can I mix different types of garden stones in my landscaping project?
Absolutely! Mixing different types of garden stones can add visual interest and depth to your landscaping. Just be sure to consider factors like colour, texture, and durability to create a harmonious blend. Experimenting with various stones can lead to stunning and unique results.
FAQ 2: How do I prevent weeds from growing between the stones?
To prevent weeds, consider using landscape fabric or a weed barrier beneath the stones. This will hinder weed growth while allowing water to drain. Additionally, applying an appropriate weed inhibitor or regularly maintaining the spaces between the stones can help keep weeds at bay.
FAQ 3: Are natural garden stones more expensive than man-made options?
The cost of garden stones can vary widely based on factors such as the type of stone, its source, and your location. In general, natural stones like granite and limestone may be more expensive than man-made options like concrete pavers. However, the durability and timeless beauty of natural stones can make them a worthwhile investment.
FAQ 4: What should I consider when choosing the colour of garden stones?
When selecting stone colours, think about the overall aesthetics of your garden. Lighter-coloured stones can create a bright and open feel, while darker stones add depth and warmth.
Consider how the stone colour complements the surrounding plants and structures to achieve a harmonious look.
FAQ 5: Can I use garden stones in a small urban garden?
Absolutely! Garden stones are versatile and can be adapted to fit any size garden, including small urban spaces.
In fact, they can visually expand the space by creating defined pathways, borders, or seating areas. Choose stones that suit the scale of your garden to maximize its functionality and charm.
Types Of Garden Stones Conclusion
In conclusion, our exploration of ‘Types of Garden Stones’ has unveiled a rich tapestry of choices to adorn your outdoor paradise.
From the versatility of gravel and chippings to the grandeur of large garden stones, we’ve journeyed through the realm of landscaping possibilities.
You’ve discovered the distinctive qualities of each stone, their ideal applications, and how they can weave magic into your garden’s design.
As you embark on your landscaping journey, armed with this newfound knowledge, remember that the choice of garden stones is not just about aesthetics but also about crafting an environment that suits your unique vision.
So, whether you’re seeking practicality, elegance, or a touch of grandeur, these ‘Types of Garden Stones’ offer you the palette to paint your outdoor masterpiece.
Now, it’s time to roll up your sleeves and bring your garden dreams to life.
Select your stones with purpose, design with creativity, and watch as your green sanctuary flourishes with the charm of these garden stones, each telling its own story of beauty and allure.